Both
Adobe Photoshop and ImageReady let you isolate different parts of an Image
on layers.
Each layer can then be edited as discrete artwork,
allowing unlimited flexibility in composing and revising
an image.
Learn how to do the following:
- Organize your artwork on layers
- Create a new layer
- View and hide layers
- Select layers
- Remove artwork on layers
- Reorder layers to change the placement of artwork in the image
- Apply modes to layers to vary the effect of artwork on the layer
- Link layers to affect them simultaneously
- Apply a gradient to a layer
- Add text and layer effects to a layer
- Save a copy of the file with the layers flattened
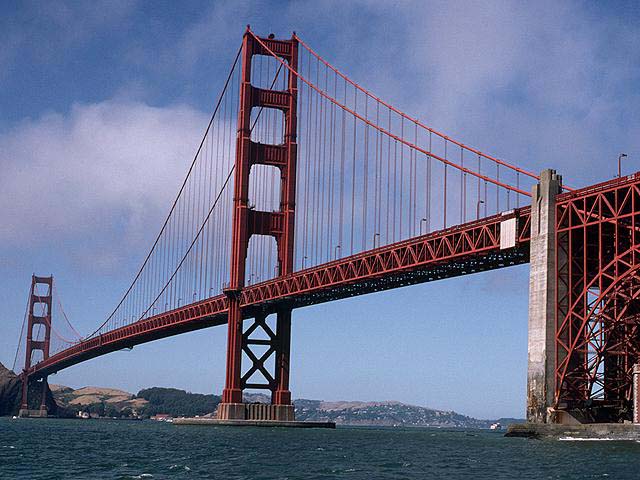
** Save
this Image to your computer and name it GoldenGateBridge.**
Note: New images are created as Background when opened in Photoshop in the layers Palette.
- Working in layers is like placing portions of the images on pieces of clear plastic sheets in layers, so you are able to edit parts(layer) of the image without affecting the other layers.
- Click here to Save the images that you will be adding to the GoldenGateBridge, Pictures.
Creating a layered image
You can create a maximum of 8000 combined layers, layer sets, and layer effects per image, each with its own blending mode and opacity. However, the amount of memory in your system may limit the number of layers possible in a single image. Because each layer, and layer effect takes up part of that maximum value, a realistic maximum value would be closer to 1000 layers.
Newly added layers and layer sets appear above the selected layer in the Layers palette. You can add layers to an image in a variety of ways.
- By creating new layers or converting selections into layers.
- By converting a background to a layer or adding a background to an image.
- By placing, dragging and dropping, or pasting selections or entire images into the image.
- By creating type using the type tool.
- By using the shape or pen tool to create a new layer that contains a layer clipping path.
-From Adobe Photoshop 6.0 online Help-
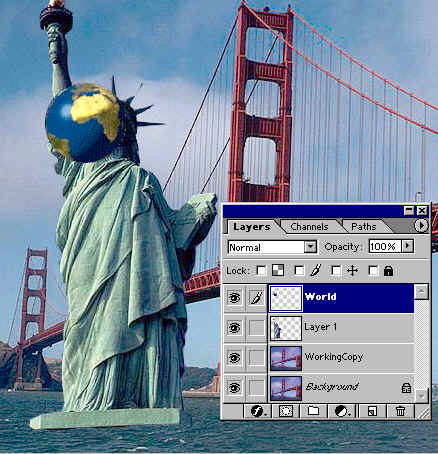
Open Image--Go to File>Open -" GoldenGateBridge."
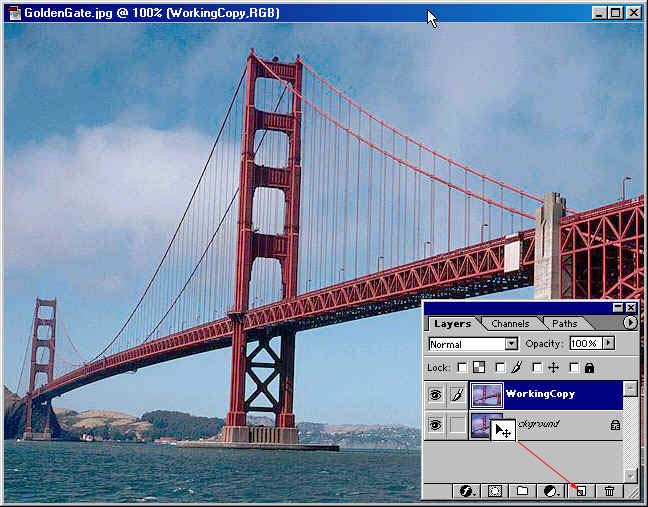
Now
in the layers palette >Left
click and Drag the background layer
to the new layer button on the bottom
of the palette. Or you can right click on
the background layer and create a new layer.
Right click on
the Copy Layer you just made of the background
in the layers palette and Left click on LayerProperties
and call it WorkingCopy.

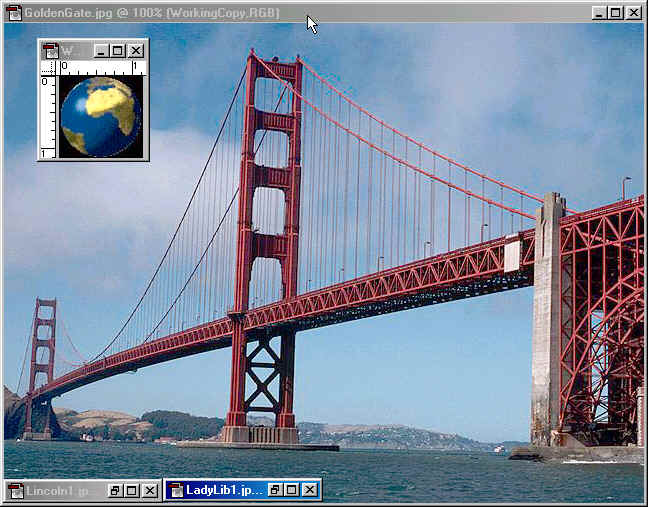
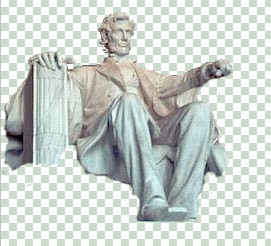
Now go to File>Open the 3 images that you saved to your computer, minimize LadyLib, and Lincoln for know. Keep the World image up to work on next.
Next
use the Elliptical marquee tool to select
just the world and to get rid of the black background.(
When using the Elliptical marquee tool you can hold down the
shift key and left click
to use a circular selection instead of and oval selection).
Now
that you have selected just the World use Ctrl+C
to make a copy of it or use selection
tool
on image Right click
and choose Layer Via Copy and Left
click and Drag on
the Copy of the
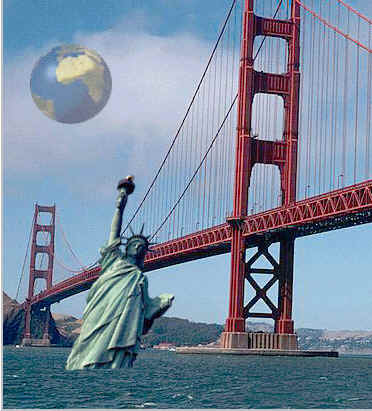
World image using the Move tool![]() into the GoldenGateBridge image.
into the GoldenGateBridge image.
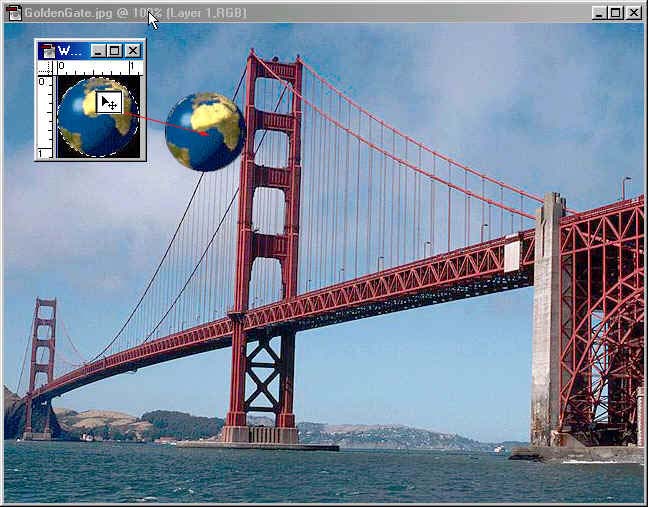
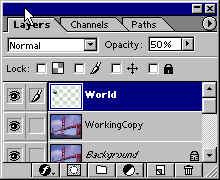
Now place the World some where in the sky area it doesn't have to be exactly where mine is. Then go to the layers palette and select the Opacity by left clicking on it and changing it to 50%.
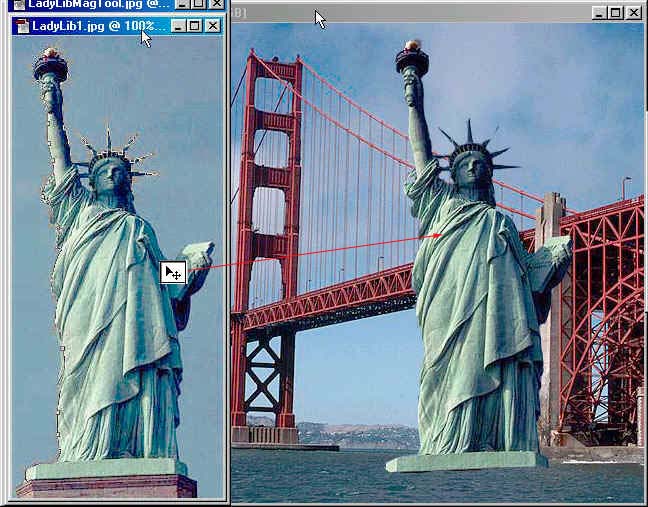
Now Maximize the LadyLiberty image to work on next.
- Use the Magnetic lasso to select just ladyLib, (this is a more difficult task so be patent, you will need to click many times to create anchors(those little squares) to select LadyLib.
- Did you make a copy of LadyLib in the layer palette and Rename it?
- Ctrl+C to Copy your selection or Right click >Layer Via Copy and Drag and Drop her using your Move tool to bring it into the GoldenGateBridge image.
At any time you can change to order of the layers by Drag and Dropping it, to better understand this use the Move tool and Drag LadyLib over the top of the World. As you can see LadyLib is on top of the World and the background,so
- Go to the Layers palette and left click on LadyLib and Drag it below the World layer and let go, now the World layer should be on top of the LadyLib layer. Look at your image, is the World on top of Lady lib, if it is you now know how to move layers in the layers palette.
- The other cool feature in the layers palette is the ability to hide a layer if you want to by left clicking on the eye. When the layer is hidden this gives you the ability to work on a layer or layers and not have the image that is hidden in the way of your work.(Change layers back when your done playing by clicking on the eye icon.)
Now select the LadyLib Layer, then go to Edit>Free Transform(or Ctrl+T) Or Transform>Rotate or Scale, depending on where you want to locate the LadyLib. I use both Scale and Rotate and the Eraser to finish her in her new location.
Setting layer blending options
The blending options in the layer Style dialog box ( Photoshop) and the Layer Options palette (ImageReady) let you change a layer's opacity and blending with the pixels underneath.
Keep
in mind that a layer's opacity and blending mode interact with the opacity
and mode of the tools you
use to paint and edit the pixels on the layer. For example,
suppose you are working on a layer that uses the Dissolve
mode and an opacity of 50%. If you paint on this layer using the paintbrush
tool set to Normal mode with an opacity of 100%, the
paint will appear in Dissolve mode with a 50% opacity because this is
the maximum the layer can display. On the other hand,
suppose you are working on a layer created using
Normal mode and 100% opacity. If you use the Eraser
tool with an opacity of 50%, only 50% of the paint will disappear
as you erase.
-From Adobe Photoshop 6.0 online Help-
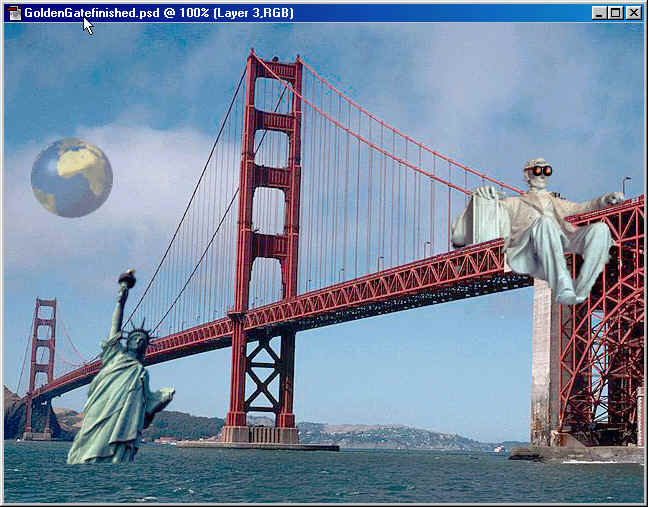
Now Maximize Lincoln's image and again we need to select Lincoln and not the background, Use the Lasso Tool, and the Eraser Tool to complete the task. How much to select is up to you, you can see what I selected.
Next
Drag Lincoln into the GoldenGateB
image, deside where you want to place him. Clean
him up if you need to, I used the Eraser
to finish him up and the FreeTransform to
scale him down. Then I used the Elliptical
Tool + Shift to make a circle, Then the paint
bucket to fill it in. Drag
and drop in
the layers Palette the circle to copy it.
Use the Move Tool![]() to Drag the copy to the other side
of his face. Click on the new layer button
to create a new layer and I used a number
3 paint brush to add the stems on the sun
glasses.
to Drag the copy to the other side
of his face. Click on the new layer button
to create a new layer and I used a number
3 paint brush to add the stems on the sun
glasses.
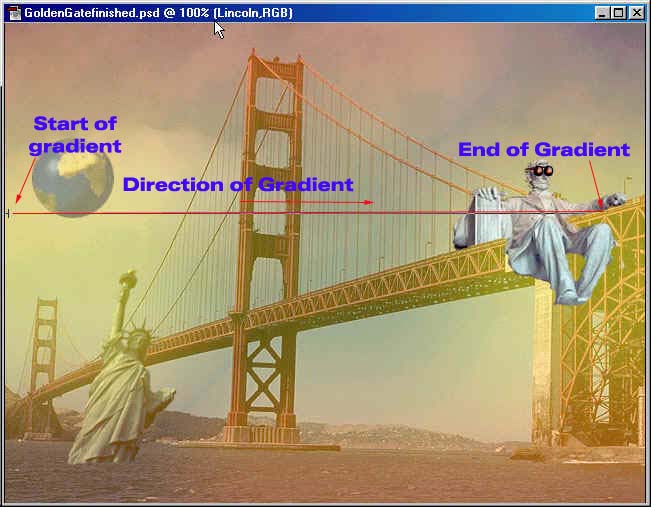
Adding a gradient to a Layer
Next
we are going to create a new layer below Lincoln's
layer and add a gradient effect to it, this
will affect any layer below it. I chose
a sunspot texture for my color in the styles
tab in the color palette.
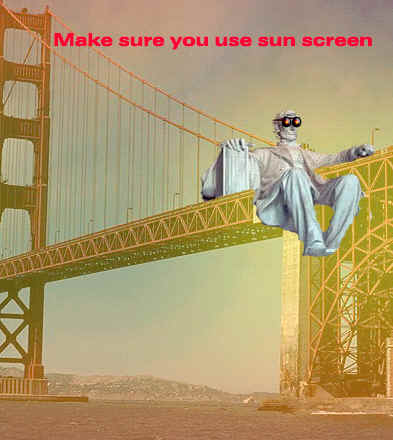
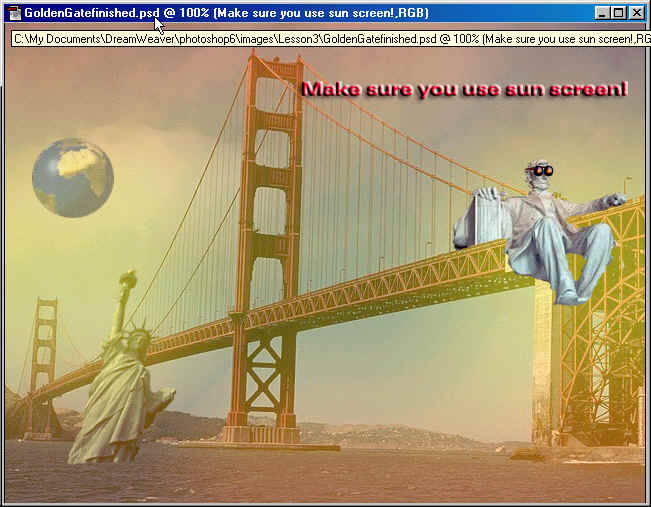
Adding text
Last,
but not least is adding text, First click on the Text
Tool . Then above it is the Text Bar
which gives your choices of font, size,
center and so on.

Type
some thing on the image "I used, Make sure you use sun screen".
I used all the above settings.
For the Web: Ensuring Readability On-Screen
A monitor's resolution is much coarser than what even the least expensive inkjet or laser printer can produce, so a common publication-preparation problem to avoid is hard-to-read type. Text that looks fine on paper often does not look good on-screen. Fortunately, since you design electronic publications on-screen, you get a very good idea as you create your publications how readable their text is. Just be sure to check the on- screen text at actual size (if you have zoom in, you know it's too hard for your readers to read). Be sure to proof the document in your browser so you will be able to view the same text quality that your readers will see.
Here are some basic guidelines for choosing readable typefaces for on-screen use:
Typeface selection: Choose a simple font designed for on-screen use. Sans serif Typefaces usually work better on-screen than serif faces. Because a monitor cannot easily reproduce the serif font's details. Serif text is generally easier to read in printed documents because the serifs give more visual clues on what letters are being used. (Serifs are those little bars and curves that extend from the ends of letters; "sans" is French for "without," so sans serif means "without serifs.") Sans serif font with subtle changes in the characters' stokes (the lines and curves that comprise a character) are usually as hard to read on-screen as are serif fonts, so be cautious about using delicate sans serif fonts for on-screen publications. Instead, consider squared, simple serifs and even-stroke serifs in online publications, using fonts specifically designed for on-screen viewing whenever possible.
Text size: Use larger sizes than what you would use in print. Typically, use12-point type for body text in electronic publications. Remember that fine differences in point size are difficult to distinguish on-screen, so avoid sizes like 11.5 and 13 points--they are too close to 12-point type.
Text spacing: Use more leading (line spacing) online than in print. Instead of the common 2 points of extra l eading for prints, use 4 or 6 extra points for on-screen publications. So, for 12-point text , you would ideally have 16-or 18- points leading on-screen.
-From
Adobe Photoshop 6.0 online Help-
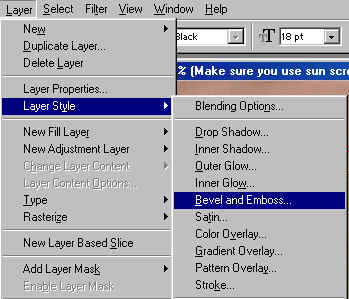
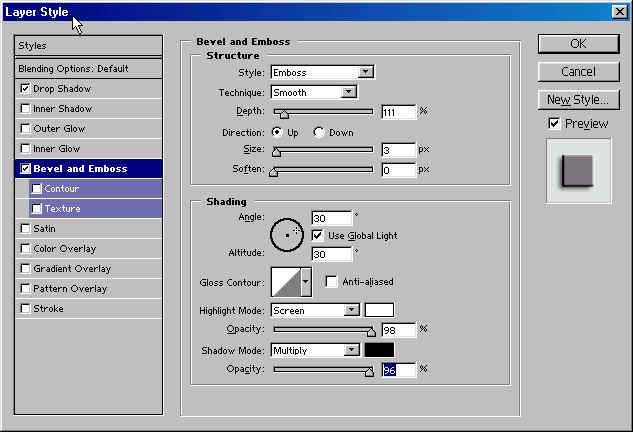
Layer styles are composed of one or more layer effects. You can apply layer styles to layers in any image. Once you apply a layer effect to a layer, you have created a custom style composed of that single effect. You can use a layer style either to replace all of the current layer effect applied to a layer, or to add layer effects while preserving the existing layer effects. After you have applied a layer effect, you can customize it. You can also save the resulting layer style for ease of reuse.
Layer styles are composed of a combination of one or more of the following effects:
- Drop Shadow to add a shadow that falls behind the contents on the layer.
- Inner Shadow to add a shadow that falls just inside the edges of the layer contents, giving the layer a recessed appearance.
- Outer Glow and Inner Glow to add glows that emanate from the outside or inside edges of the layer contents.
- Bevel and Emboss to add various combinations of highlights and shadows to a layer.
- Satin to apply shading to the interior of a layer that reacts to the shape of the layer, typically creating a satiny finish.
- Color, Gradient, and Pattern Overlay to overlay a color, Gradient, or pattern on a layer.
- Stroke
to outline the object on the current layer using color, a gradient,
or a pattern. Its is particularly useful on hard-edged shapes such as
type.
The preset layer styles in the Styles palette, Styles pop-up palette (Photoshop), and the style library are composed of on or more of these layer effects and typically have been customized to create a specific result.
-From
Adobe Photoshop 6.0 online Help-