
We're going to look at how easy it is to create a seamless, panorama image from multiple images using Adobe Bridge and Photoshop . Photoshop has had the ability to create panoramas, but it wasn't until Photoshop CS3 came along with its dramatically improved Photomerge command that its ability to stitch photos together really began to shine. Photoshop CS4 and CS5 are even better with some additional new features, including the ability to remove vignetting from photos, a common problem with wide angle images that used to result in panoramas having different brightness values as you moved across them from left to right.
To get the most out of Photoshop's Photomerge command:
- I would highly recommended that you use a tripod when taking your photos, what's important is that you remain standing in the same spot as you snap the images and don't wander around.
- Exposure, focus and focal length should be set to manual, so they remain constant in each photo.
- Overlap each image by at least 25% Adobe say's 40% is ideal, so that Photoshop has enough detail to compare between images when trying to stitch them together. 70% overlap is to much, then Photoshop has a hard time blending well.
- The more photos you're stitching together, the more memory Photoshop will require since it needs to open all the images at once.
Take pictures for Photomerge
by Adobe
Your source photographs play a large role in panoramic compositions. To avoid problems, follow these guidelines when taking pictures for use with Photomerge:
- Overlap images sufficiently Images should overlap by approximately 40%. If the overlap is less, Photomerge may not be able to automatically assemble the panorama. However, keep in mind that the images shouldn't overlap too much. If images overlap by 70% or more, Photomerge may not be able to blend the images. Try to keep the individual photos at least somewhat distinct from each other.
- Use one focal length If you use a zoom lens, don't change the focal length (zoom in or out) while taking your pictures.
- Keep the camera level Although Photomerge can process slight rotations between pictures, a tilt of more than a few degrees can result in errors when the panorama is assembled. Using a tripod with a rotating head helps maintain camera alignment and viewpoint.
- Stay in the same position Try not to change your position as you take a series of photographs, so that the pictures are from the same viewpoint. Using the optical viewfinder with the camera held close to the eye helps keep the viewpoint consistent. Or try using a tripod to keep the camera in the same place.
- Avoid using distortion lenses Distortion lenses can interfere with Photomerge. However, the Auto option adjusts for images taken with fish-eye lenses.
- Maintain the same exposure Avoid using the flash in some pictures and not in others. The blending features in Photomerge helps smooth out different exposures, but extreme differences make alignment difficult. Some digital cameras change exposure settings automatically as you take pictures, so you may need to check your camera settings to be sure that all the images have the same exposure.
Select a Layout option:
- Auto Photoshop analyzes the source images and applies either a Perspective, Cylindrical, and Spherical layout, depending on which produces a better Photomerge.
- Perspective Creates a consistent composition by designating one of the source images (by default, the middle image) as the reference image. The other images are then transformed (repositioned, stretched or skewed as necessary) so that overlapping content across layers is matched.
- Cylindrical Reduces the "bow-tie" distortion that can occur with the Perspective layout by displaying individual images as on an unfolded cylinder. Overlapping content across files is still matched. The reference image is placed at the center. Best suited for creating wide panoramas.
- Spherical Aligns and transforms the images as if they were for mapping the inside of a sphere. If you have taken a set of images that cover 360 degrees, use this for 360 degree panoramas. You might also use Spherical to produce nice panoramic results with other file sets.
- Collage Aligns the layers and matches overlapping content and transforms (rotate or scale) any of the source layers.
- Reposition Aligns the layers and matches overlapping content, but does not transform (stretch or skew) any of the source layers.
Options
- Blend Images Together Finds the optimal borders between the images and create seams based on those borders, and to color match the images. With Blend Images Together turned off, a simple rectangular blend is performed. This may be preferable if you intend to retouch the blending masks by hand.
- Vignette Removal Removes and performs exposure compensation in images that have darkened edges caused by lens flaws or improper lens shading.
- Geometric Distortion Correction Compensates for barrel, pincushion, or fish-eye distortion. Click OK.
This content above came from Adobe help
The Photomerge command can be selected through:
- Photoshop - File > Automate > Photomerge
OR
- Adobe Bridge - Tools > Photoshop > Photomerge
So let's try it out see how it works.
Let's start with a simple project with just two images. Right click on each image and choose > SavePictureAs > Save to your computer.
Make a folder on your desktop or your H-drive, where ever you saved the files to your computer. Call the folder " Photomerge" and drag the image to this folder. Now the images should be located in this folder. This is just better management of the files.
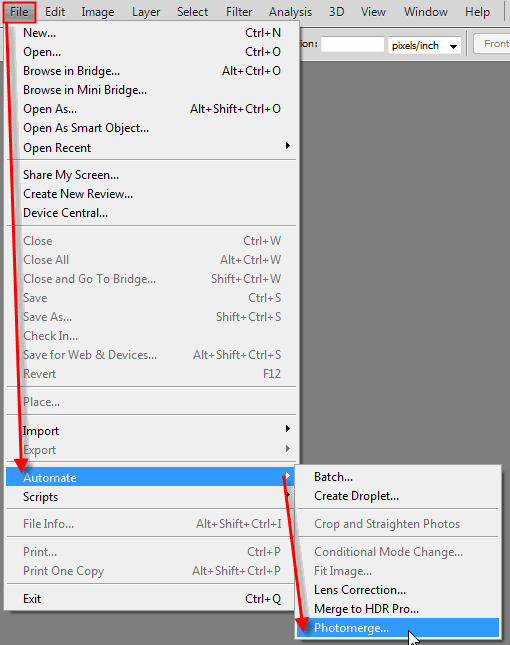
Next go to File > Automate > Photomerge.
Depending on your needs the Layout is usually going to be set to Auto for most images that you want to use a normal photo. But you may use the other settings for more artistic reasons or Auto may not work and sometimes you have to use Reposition and rebuild the image.
Under source you'll see there is a choice of Files or Folder. Since we just made a folder and put the images into the folder. We're going to choose Folder.
Next choose the Browse button to find the Photomerge folder.
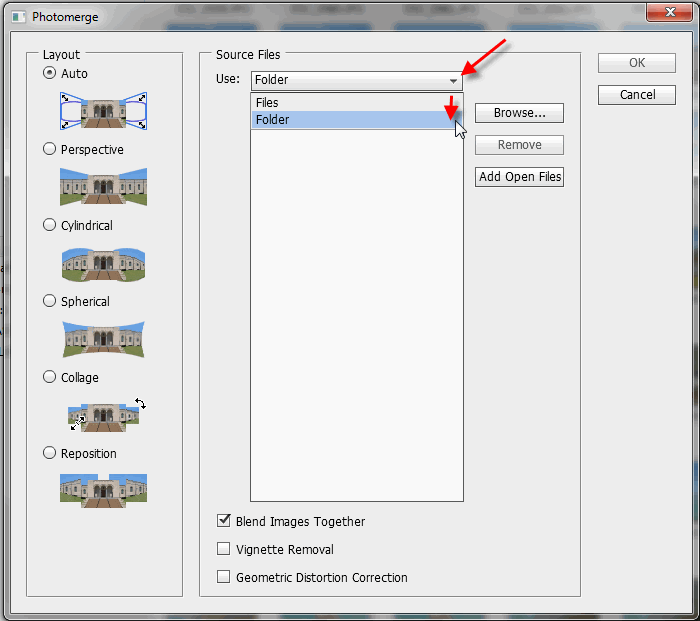
Select the folder, then select the OK button.
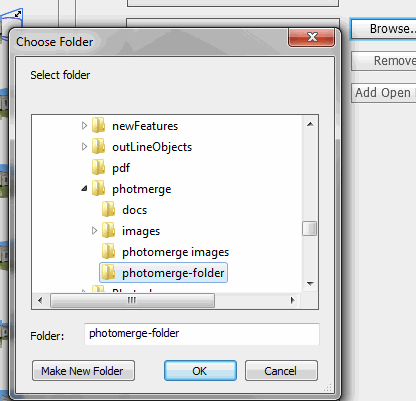
The two image names should now be visible in the the list under folder. Next select the OK button.
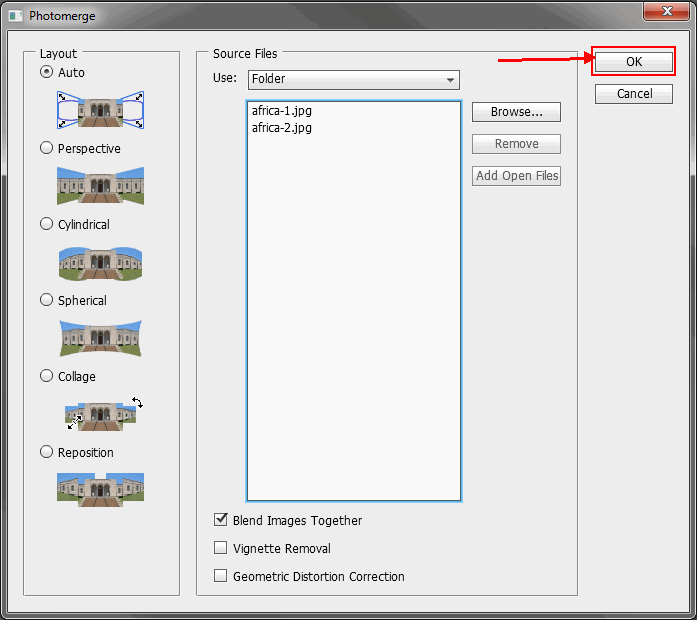
The auto part of the program will run. It will create two layers. Notice that when finished the left image is skewed, but the two images are stitched together perfectly.
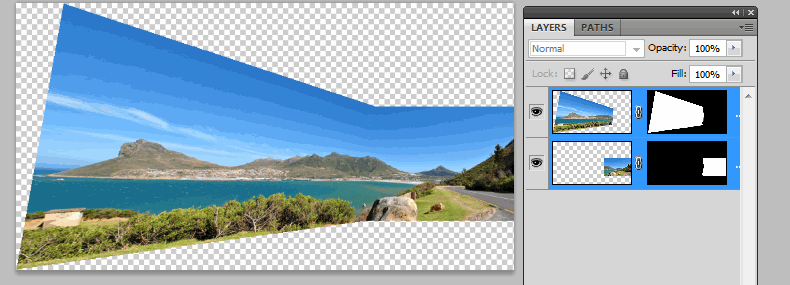
So what now? Well the only option is to choose the Crop
Tool and clean it up. Select the Crop
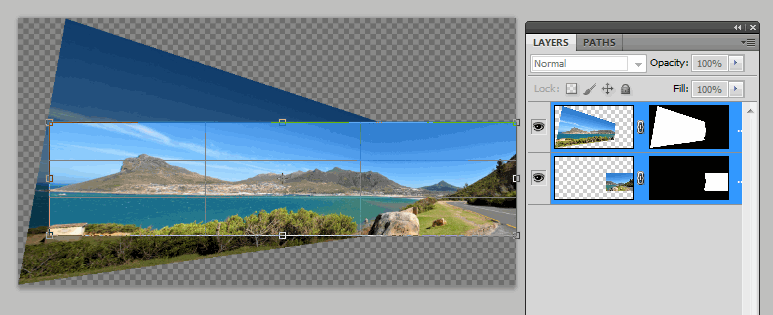
Once you have the selection done. Use the Enter key to finish the selection and you should have a new image.

That wasn't so bad now was it?
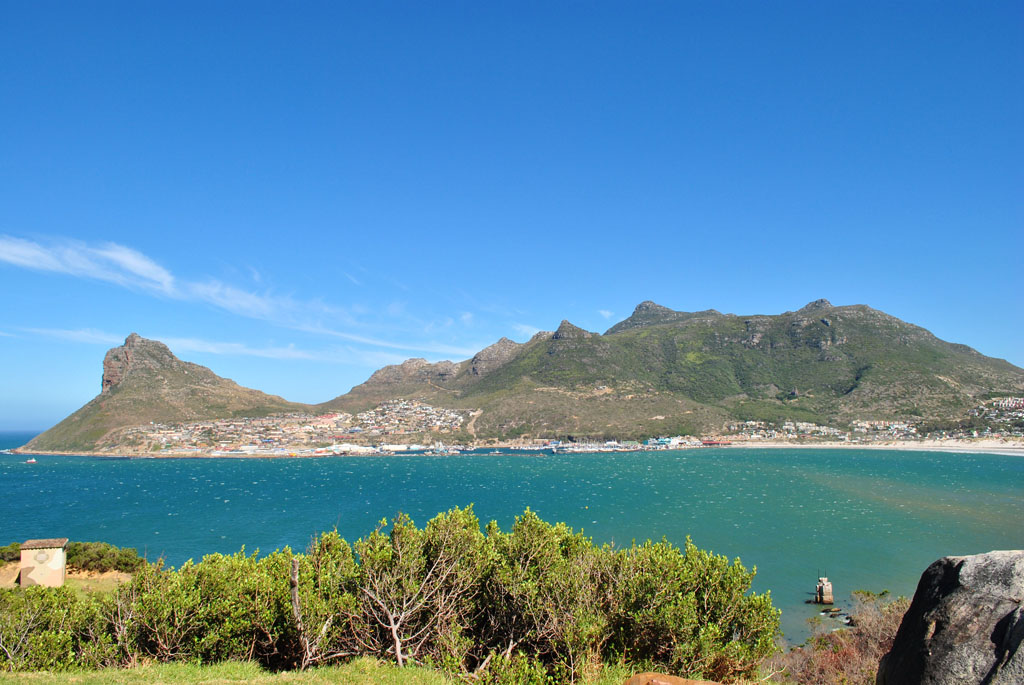
Lesson 2 has more images and it's a bit more complicated. I took a pictures of a room creating a 360 view.
To get started download the Zip folder below.
Zip Folder < Right click and choose > SaveTargetAs. Save it to your computer.
The files need to be unzipped from the zip file to do this;
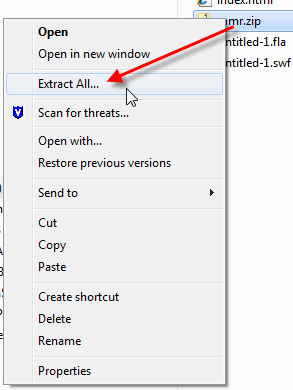
XP computers
On your computer Right click on the zip file choose something like ZipGenius > Extract here (Note: there are lots of programs out there so if you don't have a program you can download.)
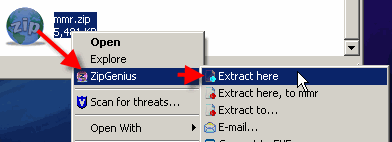
If you have the new Window's 7 operating system then > Right click and choose > Extract All... it will extract/ unzip to the same location as the zip file is located.
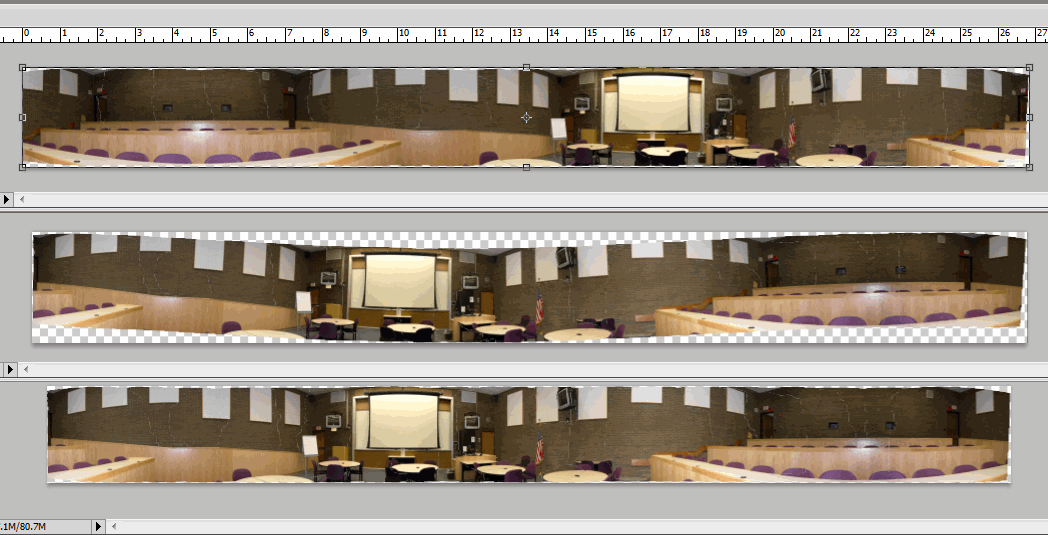
Background information: The images are from a room creating a 360 degree view. I took a tripod and placed a digital camera on the tripod. You then choose your first shot, then moving left or right doesn't matter, to shoot your next shot. The Key is to always make sure you have 25% of the last image in the new shot. Adobe Photoshop needs that much to stitch them together.
To get started go to File > Automate > Photomerge.
Select Folder in the Source Files dialog, then Browse to your lgi folder and add this folder. No other settings need to be added, select OK button to process the images.
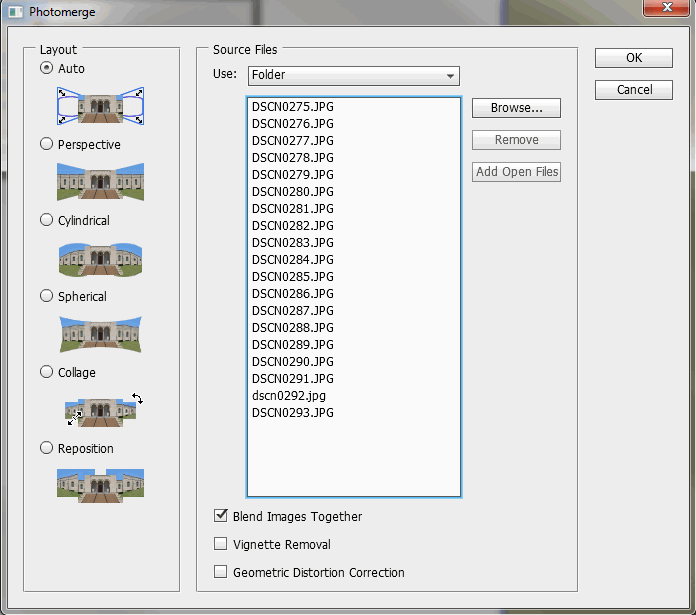
I know you're wondering what the other settings do. So just to give an example of the settings at the bottom of the Source Files, we're using "Blend Images Together" setting in this tutorial, which is the default setting.
- The first image below I chose the Vignette Removal setting - I wanted to see if it would make any difference and the only change I noticed was it flipped everything. It supposed to fix exposer?
- The second image is "Blending Images Together."
- The third image is the "Geometric Distortion Correction". If you see something different let me know would you?
Use the Crop

Now that we have the image the way that we want it. Go to File > Save > and Save a .psd file. It's always good to save a psd copy in case you need to go back into the image and make any adjustments.
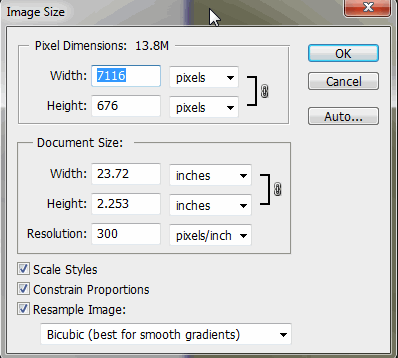
Next go to the text menu Image > Image Size and change the Resolution to 100 from 300. This will make the image size smaller, since we want to make this available on the web. Select the OK button to save the re sizing.
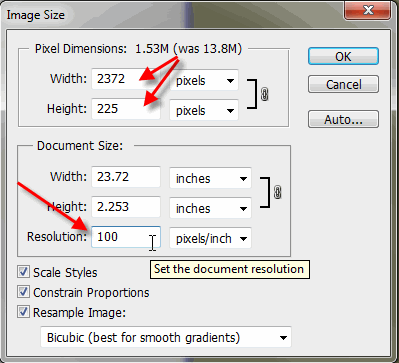
So we made the dimensions smaller which did reduce the size of the total file size, but we need to make it smaller yet. So to do that go to File > Save for Web & Devices...
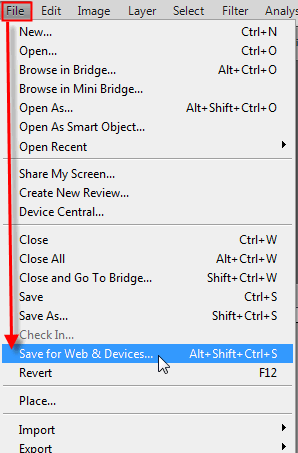
When you get to the Save for Web & Devices dialog, I prefer to click on the 4-up tab to see more examples of file reduction. I've chosen JPEG as the format and Medium for how much the image will be compressed. The file is going to change from 2MB to 47.6 KB. There are a 1000KB in 1 MB. What's great is it still looks good. Remember this is for the web not printing, we wouldn't want to do that if we were printing this image.
Select the Save button when your done. Save it to your folder with the other images.

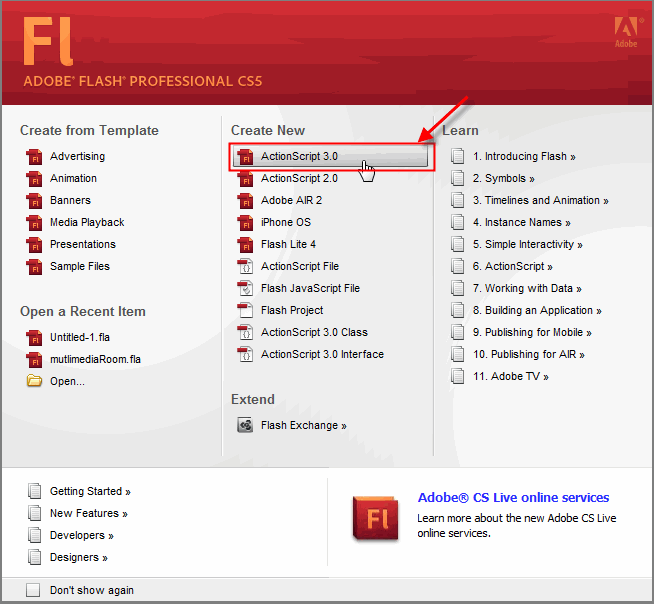
Now I would like to show you how this can be used on the web. To do this we're going to launch the Adobe Flash program. Go to Start > Programs > Adobe Master Suite > Flash. This image below is CS5, so yours may look just slightly different.
Select ActionScript 3.0
The Stage (canvas) needs to be adjusted to fit the image we just created. This adjustment is found under the Properties panel on the CS4-5 is located on the left. If you're using CS3 it's located on the bottom of the application. The Height needs to be changed to 225px. To do this select the Edit button in the Properties. You can see the default Stage is 550px x 400px.
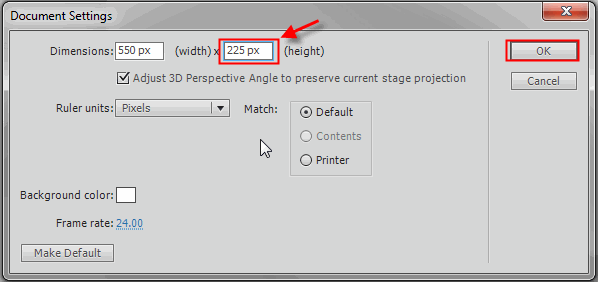
In CS3 you won't have this dialog below, you'll just make the changes in the first window of the Properties. This is for CS4 & 5 folks. Whatever software version change the Height only to 225px and then click the OK button.
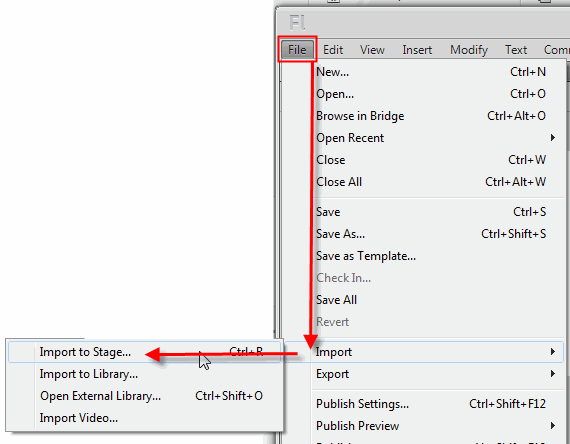
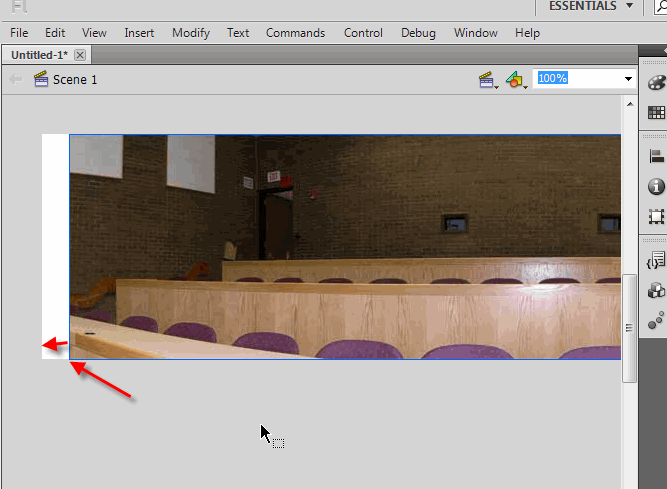
Now we're ready to Import our room image (lgi.jpg) into Flash. To do this go to File > Import > Import to Stage, then select your room image and choose the Open button.
Drag the left end of the image to the left end of the Stage. Holding the Shift key down when moving the image will help keep it from moving up and down.
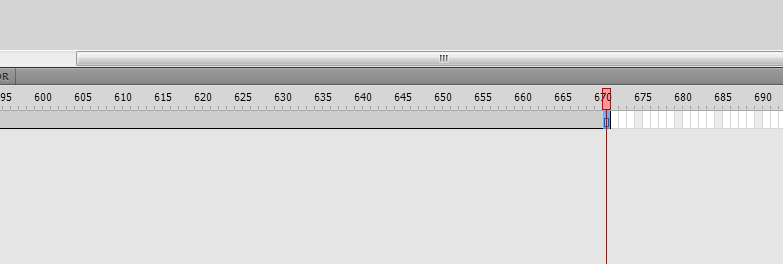
Now on the Timeline scroll to the end of it, which will be around 670, left click and select the last frame. Then use the F5 key this will add frames up to the 670.
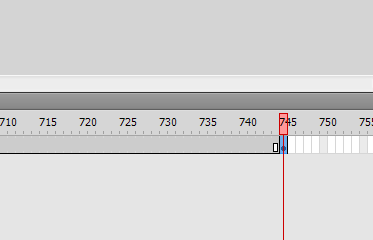
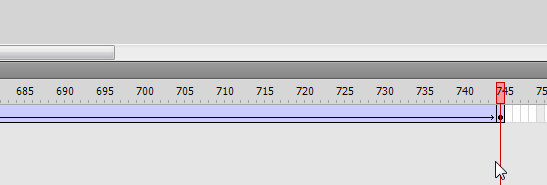
Now scroll to about 745 frames and select that frame and use the F6 key this time which is going to add a Keyframe.
Next on the Time line on a frame somewhere around 500, Right click and choose Create Classic Tween.
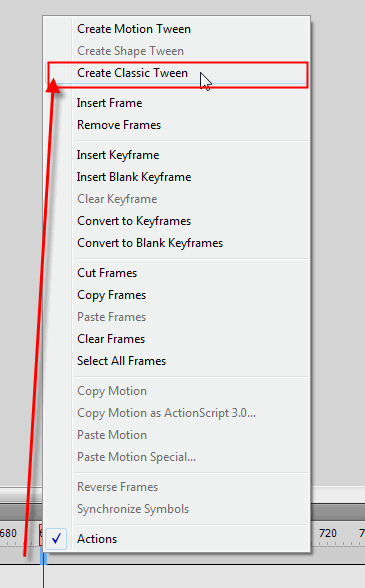
You'll see a long arrow that should point to frame 745. Right click on 745 and choose Create Classic Tween again.
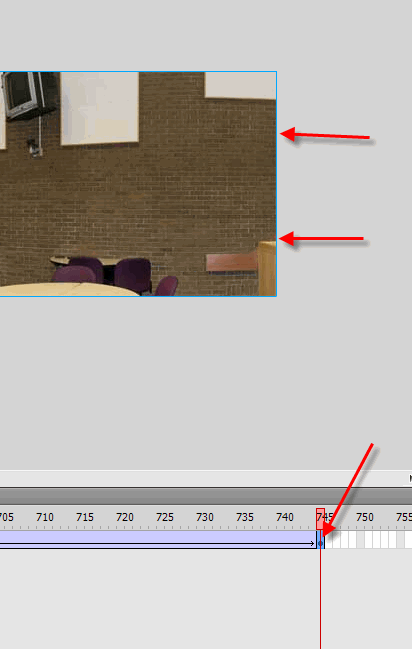
With frame 745 selected, grab and drag the image to the left until you see the white on the Stage. Then just pull the image back to cover the white.
Now let's view what we just created. Use the Ctrl + Enter keys together to export the movie.
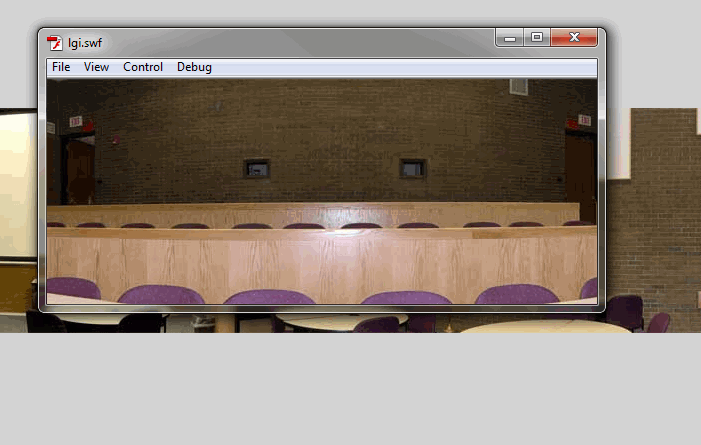
This is what it should look like. Now if this were a Flash Class we would add more functionality to it so the end user would have more control with maneuvering through the image. But it's not. :)
I wanted to give you a taste of Flash but also to see why you might stitch so many images together.